
Wide-Angle Wildlife Photography in the Field
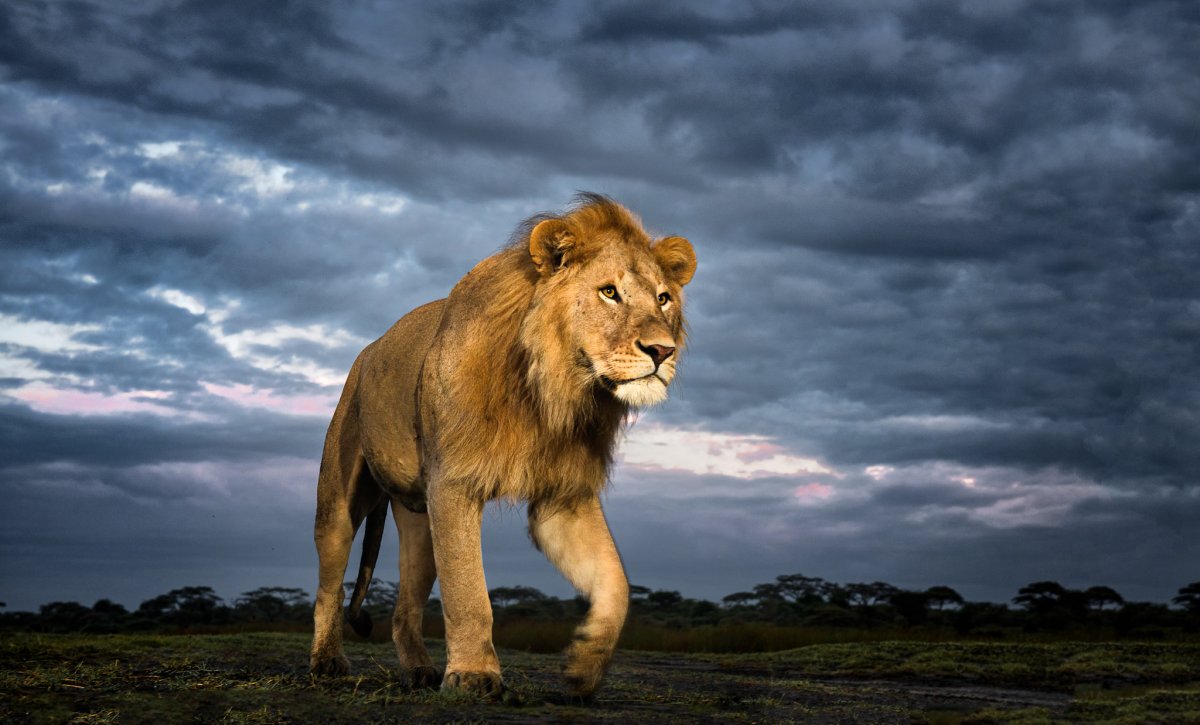

Wide-angle wildlife photography can bring an animal and its surroundings into the same frame, adding a fresh perspective to a portfolio of wildlife images. Lenses from about 15 mm to 35 mm can work, depending on the subject. A thoughtful camera position along an animal’s path helps make the landscape part of the story.
Getting close to this kind of image takes care and planning. This guide explains how to focus manually, set exposure with aperture priority, and choose a low camera position near an animal pathway. You’ll also learn how wide-angle compositions can add variety while keeping animal welfare in mind.
For wide-angle wildlife photos, focus manually on the animal’s expected position, then compose with habitat around it. At night, use a wide-aperture lens and a camera with flash; a dead-leaf katydid, for example, was photographed at f/8 with a 10-second exposure and flash.
For a remote camera, switch the camera or lens to manual focus so it won’t refocus when an animal enters the frame. Focus on the spot where you expect the subject to appear, then check the viewfinder or screen to make sure nearby habitat remains part of the composition.
Set the aperture to control how much of the scene looks sharp, and let the camera choose the shutter speed. For a remote wildlife setup, try f/8; this can keep more of the animal and its surroundings in focus than a wide-open setting.
Prime lenses may open to f/1.4 or f/2.8, letting in more light for night shooting. A wide aperture can also separate a close subject from its background. For a locust photographed two centimetres away, use a relatively wide aperture to show its habitat without losing the subject’s detail.
Check that the shutter speed suits the animal’s movement, especially in dim light. A sample wildlife photograph used f/7.1, 1/125 sec, and ISO 1250. For a night scene, a flash can help reveal detail during a long exposure, as in the 10-second katydid example.
For remote wildlife photography, focus on the expected point of arrival before leaving the camera unattended. Set the camera or lens to manual focus during setup, so an animal entering the frame won’t trigger refocusing and shift the intended focus.
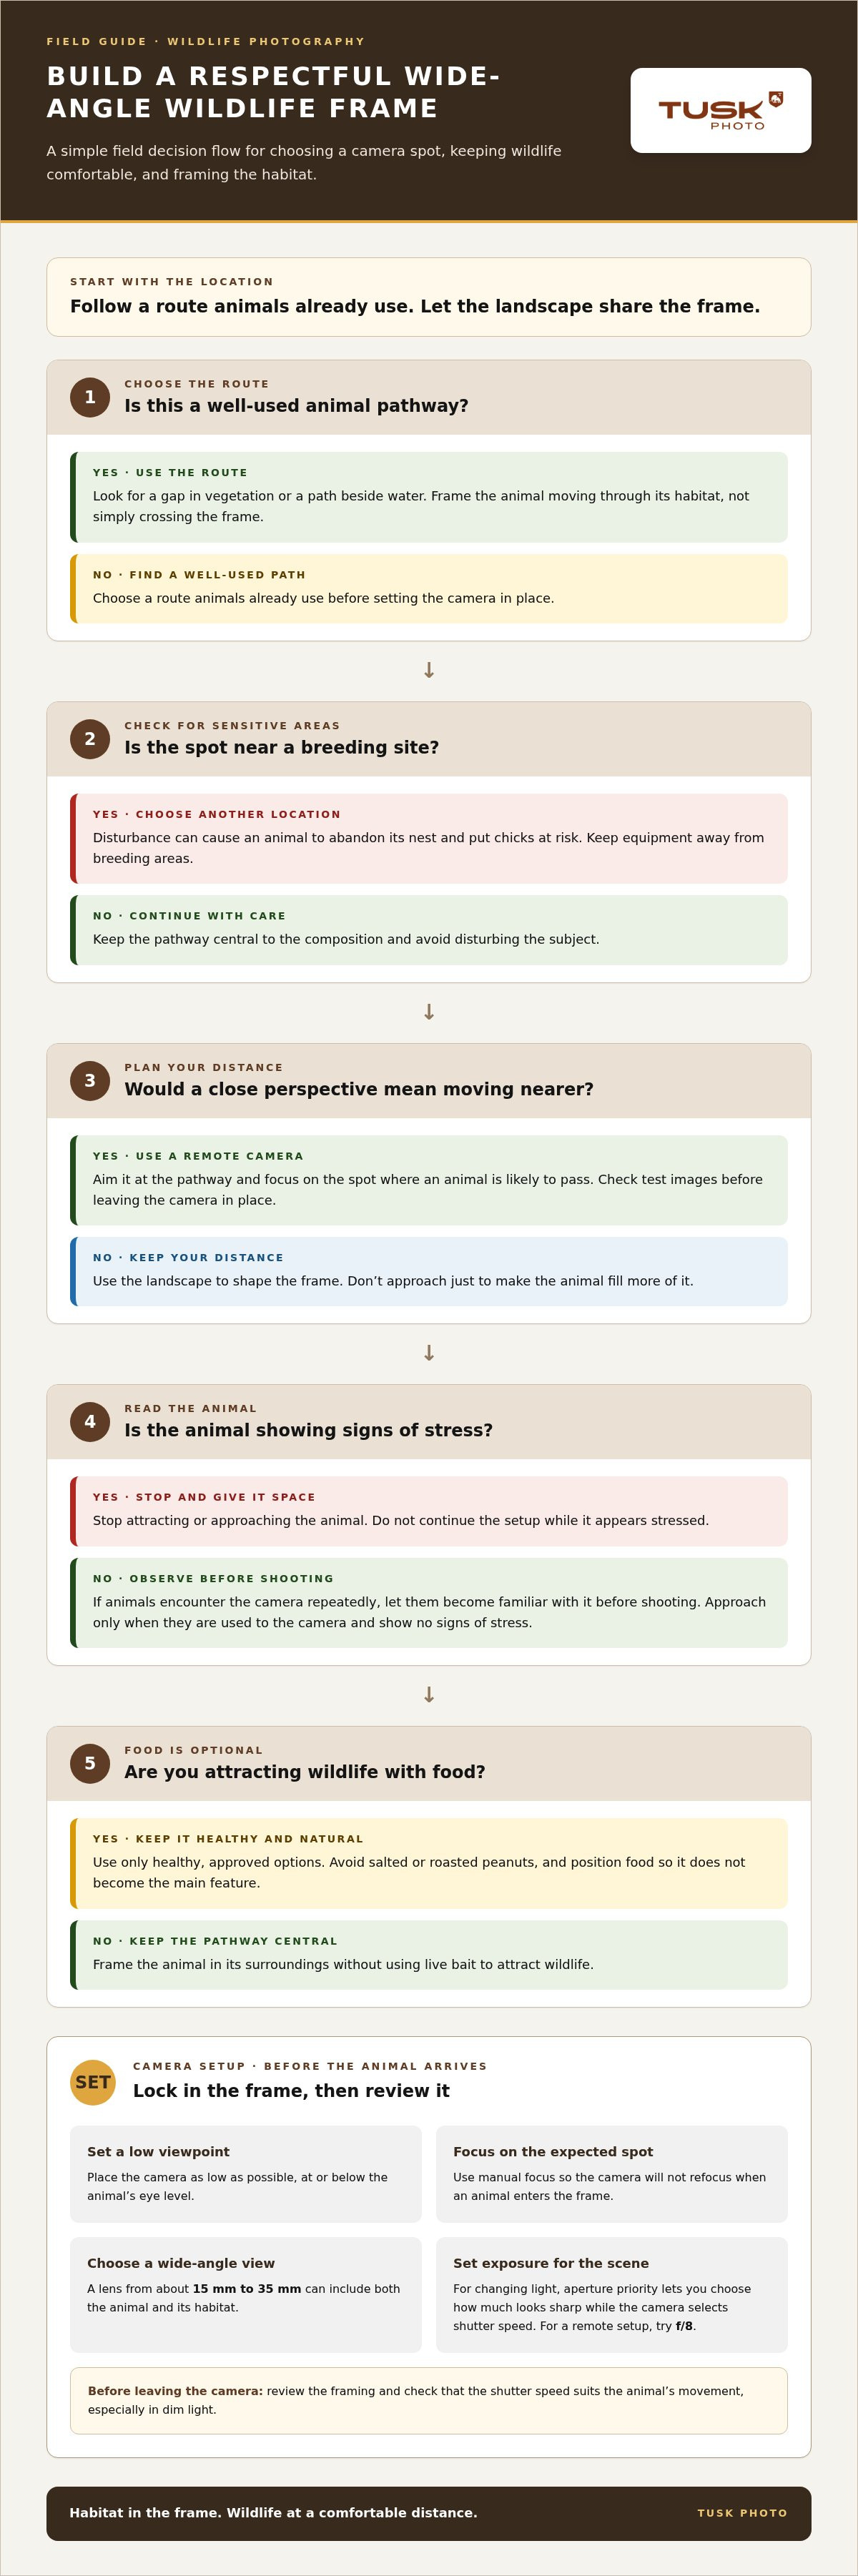
Choose a route animals already use, then frame both the surroundings and the subject. For close-up images, keep your distance and use a remote camera where possible.
•
Look for a well-used path, such as a gap in vegetation or a route beside water. Position the camera to capture the animal moving through its habitat, rather than simply crossing the frame. Avoid breeding sites: disturbance can cause an animal to abandon its nest, putting chicks at risk. Never use live bait to attract wildlife.
•
Set the camera as low as possible, at or below the animal’s eye level. This viewpoint makes environmental portraits feel more connected to the subject’s world. If animals encounter the camera repeatedly, allow them to become familiar with its presence before shooting. Watch their behavior, and only approach wildlife that has become used to the camera when it shows no signs of stress.
Aim it at the pathway and focus on the spot where an animal is likely to pass. Keep the equipment away from breeding areas, and review test images to check the framing before leaving the camera in place. This approach lets you capture images without moving closer to wildlife.
If you attract animals with food, use only healthy, approved options, and avoid salted or roasted peanuts. Position the food so the scene still looks natural, rather than making it the main feature. If an animal appears stressed, stop attracting or approaching it and give it space.
For wide-angle wildlife photography, positioning the camera low, at or below the animal’s eye level, keeps habitat in the frame while preserving an animal-level perspective. If you attract wildlife with food, use healthy, approved options; salted or roasted peanuts are not appropriate. Keep the pathway central to the composition.
A wide-angle lens captures habitat and context, while a telephoto lens brings distant animals closer in the frame. In U.S. parks and refuges, follow posted guidance and keep enough distance that your presence doesn’t change an animal’s behavior.
Choose a 15 mm to 35 mm lens, depending on the subject and surroundings. Include details such as a shoreline, forest canopy, or open plain to show where the animal lives. This adds a sense of place that a tightly framed telephoto image may leave out.
A wide angle lens can make nearby features appear prominent and the animal appear smaller. Move only when it’s safe and permitted, then adjust your position to balance the subject with the landscape. Don’t approach simply to make the animal fill more of the frame.
Decide how much of the scene should appear in focus. A smaller aperture can keep more habitat clear, while a wider aperture can draw attention toward the animal. Review the frame for distracting foreground details, then shift your camera position rather than disturbing the subject.
Photograph the setting with an angle lens, then use a telephoto view to show behavior or detail from farther away. Super-telephoto lenses at 600 mm or 800 mm can lose sharpness through atmospheric distortion, so compare results rather than assuming greater reach always gives a clearer image.
Place an environmental portrait beside a close animal portrait. For example, a bird against its wetland and a tighter image of the same bird show different parts of the encounter. That visual change gives a portfolio more range without repeating one composition.
Tusk Photo’s Scheduled Tours offer a natural next step if you’d like to practise wildlife photography in the field. Experienced guides lead journeys to wildlife destinations, with photographic opportunities for beginners and seasoned photographers alike. Apply the techniques in this guide, from framing an animal in its habitat to choosing a respectful camera position.
If you have a particular destination or photographic goal in mind, Tusk Photo also offers Tailor Made Tours and On Demand Tours. These options let you shape a wildlife journey around your interests.
Explore Tusk Photo’s scheduled wildlife tours and find a field experience that suits your photographic interests.
Let your next field outing be guided by a visual idea, not just a wish list of species. A wide-angle wildlife photography approach can help you build a distinctive portfolio by showing how each animal belongs in its surroundings. Choose a landscape that draws your eye, then consider what story a wildlife encounter might add. Over time, these choices can shape a thoughtful, recognisable personal style.
If you’d like to plan a wildlife photography journey around the images you hope to create, talk with Tusk Photo. Contact Tusk Photo to discuss your photography and take the next step toward your field project. Your next memorable frame begins with a clear idea and the care to follow it.
A 14 mm lens can create a strikingly broad view on a full-frame camera. On a Nikon crop-sensor camera, the 1.5x crop factor means the camera captures a narrower view, making the lens’s angle of view similar to a 24 mm lens on a full-frame camera. Choose based on how much habitat you want to include.
Choose settings based on animal movement and available light. Use a faster shutter speed when the subject is moving, and raise ISO if dim conditions make the image too dark. For a still subject, adjust the aperture to control how much of the scene is sharp. Review a test frame and adjust as needed.


