
A Practical Guide to High-Key Wildlife Photography
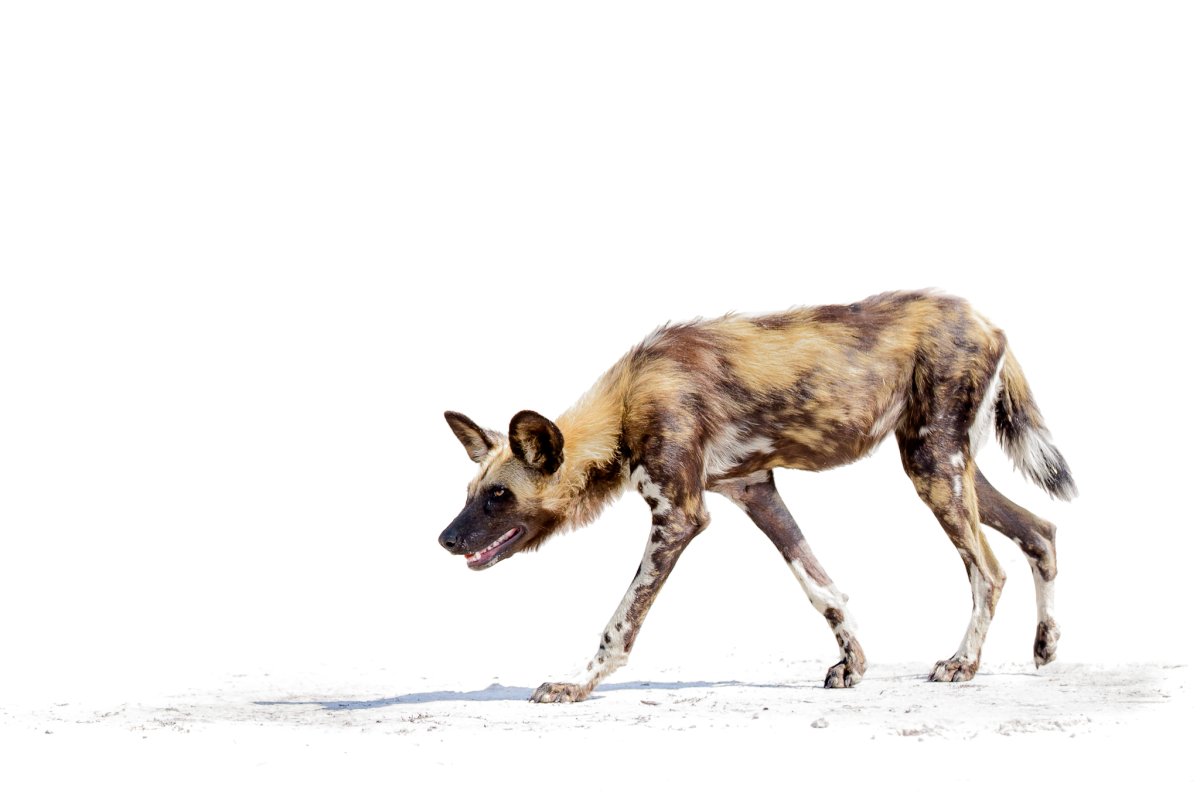

What if you could turn a pale sky or snowy landscape into a clean, luminous backdrop without losing the texture in an animal’s fur or feathers? That balance is the heart of high-key wildlife photography. It’s natural to worry that brightening a scene will wash out the details that make the subject compelling. This guide to high key wildlife photography shows you how to create a bright frame while keeping the animal clear and full of life.
You’ll learn how to choose a suitable background, compose the frame, and adjust exposure as field light changes. You’ll also see how to check highlights and refine an image in editing without making it look artificial. The goal is a repeatable approach you can use in the field, with the animal’s key details in view.
A high-key image uses a bright tonal palette to create a light, uncluttered feel. The background may appear white or nearly white, while careful exposure keeps the animal’s features clear. A useful guide to high key wildlife photography starts with this balance: brightness sets the mood, but the subject still needs enough tone and texture to feel present.
High-key is a creative exposure choice, not simply a photograph made too bright. You might let a pale sky or snow lose some texture so it reads as a clean backdrop, while preserving detail in the animal. Bright whites are a visual choice; clipped highlights are areas where image detail has been lost. A white background can suit the frame, but featureless fur or feathers may weaken the subject.
Check the animal before deciding whether the exposure works. Can you see the eye and read the texture in its fur, feathers, or other defining features? If those details remain clear, a very bright frame can still feel controlled. The right balance depends on the subject, background, available light, and mood you want to create.
Check the histogram, a graph showing how tones are distributed. If it piles up against the far right edge, some highlights may be clipped. That’s a warning, not an automatic verdict: the graph represents the whole frame, so it can’t tell you whether lost detail is in the background or on the animal.
Review the image itself, especially the eye and the areas that give the subject its character. A bright, featureless background may be intentional; lost detail in those key areas may not be. Compare the histogram with what you see in the photograph rather than relying on either one alone.
Build the frame in stages. A repeatable routine helps you respond to changing light without relying on a fixed exposure recipe.
Overcast skies, mist, and snowy settings can provide a naturally bright background and gentle light on the animal.
Look for a clean backdrop without branches or other distracting shapes. Leave room in the frame for the animal’s gaze or movement when it suits the moment.
Choose a metering mode that takes the animal into account, rather than letting a large bright background dominate the camera’s reading. Check that the focus point and meter are reading the area you intend.
Use exposure compensation to test a brighter setting in small steps. The amount needed depends on the scene, so treat each change as an experiment, not a rule.
Metering and exposure compensation work together. A bright background can lead the camera to darken the whole scene. Metering for the animal or adding positive exposure compensation can counter that response. Then consider the exposure controls: shutter speed affects motion blur, aperture affects how much of the scene appears in focus, and ISO affects the camera’s sensitivity to light. A moving animal may need a faster shutter speed, while a still subject gives you more room to balance the other settings.
After every exposure change, check both the animal’s key details and the brightest areas of the frame. Review the photograph and histogram, then adjust again if needed. If your camera has a highlight warning, use it to spot areas at risk of clipping. The right balance shifts with the subject, background, and light, so judge each frame against the scene rather than copying a universal recipe.
Time in the field helps you practise reading how wildlife and light change around you. Guided wildlife photography tours give you the chance to observe and photograph alongside experienced guides.

Before editing, look at the frame as a whole. Is it bright enough for the mood you wanted? Can you still see the animal’s defining features? Check whether a branch, shadow, or uneven patch of background pulls attention away from the subject. Whites should feel clean, but not so stark that the animal looks pasted into the scene.
Make small changes and review the image after each one. Adjust exposure or highlights to brighten the background. If only one area needs attention, use a local adjustment rather than changing the whole frame. A little contrast or sharpness on the animal can bring out texture, but too much can make fur and feathers look harsh. Check the edges of any selective adjustment, too. A bright outline or halo around the subject is a sign to ease back. If the whites look blue or yellow, a gentle white balance correction may help.
The fundamentals behind the frame matter just as much as editing. Reading the light and choosing a clear composition can make a high-key image work before you open an editing tool.
Keep the image if the subject is clear and you can correct the tonal balance without making the animal or background look unnatural. If important highlights or features are blank, smooth patches with no visible texture, editing can’t restore detail that wasn’t captured. When you have the chance, try another exposure or composition. A fresh frame may preserve the animal’s features and simplify the backdrop more naturally.
Practise making these choices as light and wildlife change in the field. Wildlife photography tours give you the chance to learn alongside experienced guides.
Use each outing to notice how light shapes the scene. Watch how the animal sits against its background, and try different framings as conditions change. Rather than chasing a perfect white backdrop, aim for a balance that feels true to the encounter. With practice, the ideas in this guide to high key wildlife photography can become a way of seeing that develops with every trip.
If you’d like to practise in the field with experienced guides, Tusk Photo offers scheduled, tailor-made, and on-demand wildlife photography tours. Choose an expedition style that suits your plans, then bring your curiosity and keep learning from each moment outdoors. Explore wildlife photography tours and take your next step toward bright, natural images that preserve the character of the wildlife in front of you.
Yes. Overcast conditions can work well for high-key images, especially when the cloud cover is bright and even. Before settling on a position, scan the sky for darker cloud bands or bright openings that could create uneven patches behind the animal. A pale bird against a pale sky may blend in, so wait for a clearer outline or choose a different viewing angle.
Yes. Dark fur or feathers can stand out against a pale setting, such as a seal on a light shore or a raven against open cloud. Look for a clear edge between the animal and its background, and avoid letting deep shadows merge into one solid shape. A small change in viewpoint may reveal more of the animal’s outline.
Yes, but start with a file that has room for tonal adjustments. RAW files generally offer more editing flexibility than JPEGs, which can help when balancing bright areas or adjusting selected parts of the frame. Treat editing as refinement: if fur or feathers have become featureless, sliders can’t restore the missing texture.
No. High-key describes a bright overall treatment, while black-and-white describes an image without color. The two can overlap: a monochrome wildlife photograph can have pale tones and a bright background, but a color photograph can be high-key too. Choose monochrome for tonal simplicity, or keep color when subtle hues in the animal or setting add to the scene.


